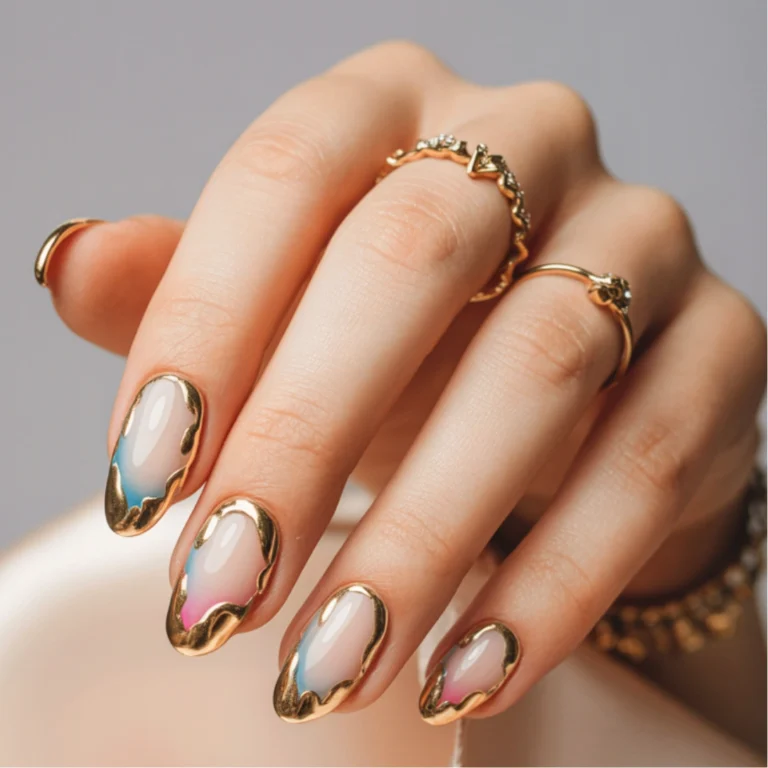
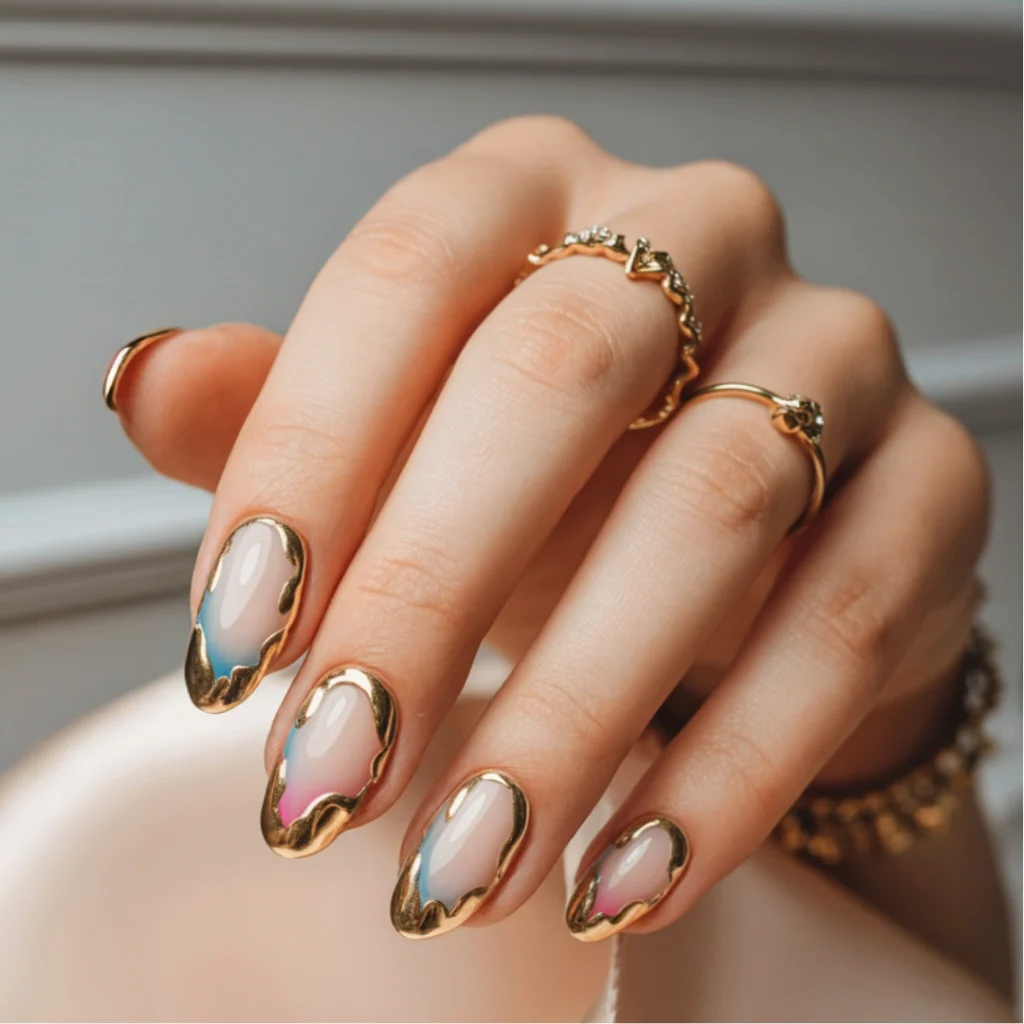
Hey there, nail besties! 💅✨ I’m so excited to share this one with you today! Last week, a regular client walked into my salon asking for something “luxurious but not too extra” for her sister’s engagement party. After scrolling through some inspiration, we landed on what I now call the Golden Mirage design – and oh. my. goodness. The compliments haven’t stopped rolling in!
Create stunning golden mirage nails at home! Our easy DIY guide provides nail ideas for achieving this perfect, shimmering look. But what exactly makes this Golden Mirage design so special? Imagine the most perfect blend of sophisticated nude glossiness with delicate gold accents that catch the light with every movement of your hands. Intrigued? Let me walk you through creating this dreamy look yourself!
What You’ll Need
Before diving into this gorgeous elegant gold nail design, gather these essentials:
- Base coat (your favorite will do!)
- High-gloss nude polish (choose one that complements your skin tone)
- Sheer pink and sheer blue polish (for that subtle ombré effect)
- Gold chrome powder (the more mirror-like, the better!)
- No-wipe top coat
- Thin nail art brush or detail liner
- Regular glossy top coat
- Almond-shaped nails (natural or press-ons work great!)
💭 Quick Tip: Not sure which nude shade works best? Hold different bottles against your wrist to find one that enhances rather than washes out your natural skin tone.
Time Needed
For this unique nail design, set aside:
- Beginners: About 60-90 minutes (including drying time)
- Experienced nail lovers: 35-45 minutes
Don’t rush the process, especially when working with chrome powder! Better to take your time and achieve that perfect finish. ⏱️
Let’s Do It
Step 1: Shape and Prep Your Canvas
Start with clean, dry nails. File them into a medium almond shape – we want elegant curves that taper softly to the tip. Gently buff the surface to create the perfect foundation.
Pro tip, babe: If using press-ons, select almond-shaped ones to save yourself time and effort!
Step 2: Lay Down Your Protection
Apply your base coat evenly across each nail. This isn’t just for longevity – it prevents staining and gives you that smooth starting surface we need for this classy nail design. Let it dry completely before moving to the next step!
Step 3: Create Your Nude Foundation
Apply two thin coats of your high-gloss nude polish. Patience is key here, hon – let each layer dry completely before adding another. We’re building a flawless base that looks like your nails but better! 💖
Step 4: Add That Magic Ombré Whisper
Now for the subtle magic touch that makes these truly unique nail designs! Using your small nail art brush, lightly apply sheer pink at the base of your nail and sheer blue at the tip. Blend them where they meet for a whisper-soft gradient effect.
Remember, keep it sheer! This ombré is meant to be a subtle hint under your golden accents.
Step 5: Prep for Chrome Magic
Once your ombré is completely dry, apply that special no-wipe top coat and cure if you’re using gel. This step is crucial for the gold chrome to adhere properly!
Step 6: Create Your Golden Frame
This is where your golden nail design comes alive! 🌟 Dip your thin nail art brush into the gold chrome powder. With gentle, deliberate strokes, trace a border around the edges of each nail, creating that gorgeous melting gold effect.
Take your time with this step, bestie. Light, controlled strokes create that sophisticated dripping gold look we’re after!
Step 7: Seal Your Masterpiece
Lock in your beautiful work with a generous layer of glossy top coat. This brings the whole elegant gold nail design together while protecting your hard work.
Style It Your Way
Your Golden Mirage nails are perfect for:
- Brunch dates (hello, champagne flute selfies!)
- Wedding guest looks (without upstaging the bride)
- Job interviews where you want to look polished but professional
- Date nights when you want to add subtle glamour
Pair with thin gold rings or delicate bracelets to enhance that metallic shine. These nails work beautifully with both casual and formal outfits – they’re that versatile! 👑
Want to Switch It Up?
Love the technique but want to make it your own? Try these variations:
- Swap gold for rose gold for a softer, romantic vibe
- Try silver chrome for a cooler, more modern take
- Use a deeper nude base for a more dramatic contrast
- Add a tiny rhinestone at the cuticle for extra sparkle
- Try this on coffin or stiletto shapes for a bolder statement
Help It Last Longer
Keep your gorgeous gold nail design looking fresh with these tips:
- Apply an extra top coat every 2-3 days
- Wear gloves when cleaning or doing dishes
- Apply cuticle oil daily to prevent chipping from dry edges
- Avoid hot tubs or long baths which can cause lifting
- File any minor chips rather than picking at them
Before You Go
Remember, nail besties, the beauty of DIY designs like this Golden Mirage nail art is making it your own! Don’t stress about perfection – even with slight variations, this look is absolutely stunning. And I’d LOVE to see your creations! Tag me in your nail pics or drop them in the comments – watching you rock these designs makes my day! 💕
Wondering what other elegant nail designs to try next? Check out our Black and Gold Geometric Nail Tutorial for another sophisticated look that pairs beautifully with this style!
FAQs
How long does the gold chrome powder typically last on nails?
With proper application and sealing with a quality top coat, your gold chrome effect can last 1-2 weeks on regular polish and up to 3 weeks on gel! The key is that no-wipe top coat layer before applying the chrome.
Can I use regular gold nail polish instead of chrome powder?
While you can use a metallic gold polish for a similar effect, chrome powder gives that mirror-like reflection that makes this designer nail look truly special. If using polish, choose one with a fine shimmer rather than chunky glitter.
Are almond-shaped nails necessary for this Golden Mirage design?
The almond shape enhances the elegant flow of the gold chrome border, but this unique nail design works beautifully on oval, squoval, or even coffin shapes! Just adjust the dripping pattern to complement your nail shape.
Will this design work on short nails too?
Absolutely! For shorter nails, focus the gold chrome border around the sides rather than creating a full frame, and keep the ombré subtle. You’ll still get that gorgeous mirage effect on a smaller canvas.
How do I remove the chrome powder without damaging my nails?
Soak a cotton pad in acetone-based remover, place it on the nail for 30-60 seconds, then gently wipe away. For stubborn areas, use a wooden cuticle stick rather than scrubbing, which can damage your natural nail.